How to Upload and Display Image in Html Mongodb
In this tutorial, nosotros are gonna use the Multer Library for uploading the prototype. The prototype uploading characteristic is used in so may product sites like social media, e-commerce site etc.
What is Multer?
⇒Multer is node js middleware used to handle multipart/form-data which is primarily used for uploading the files. The image can be saved in a buffer format in the database.
Schema for Image
- Create a new Schema for images and pass the following parameters.
- Set the data to buffer as the paradigm will be uploaded in the buffer string the contentType volition exist a cord.
- Crave the Mongoose and connect to the database.
var imgSchema = mongoose.Schema({ img:{information:Buffer,contentType: Cord} }); var prototype = mongoose.model("image",imgSchema); MongoDB actually stores buffer in a special binary course. A MongoDB binary is only a wrapper effectually a buffer with an additional sub_type holding. When we declare a mongoose schema type every bit a buffer, then Mongoose cast a buffer on its own.
Disk Storage
As the image volition be uploaded in the database the developer does not have full control. Hence multer provides the choice to save the file/epitome in disk storage.
- Diskstorage function of multer is used to store images/file to deejay
- It is passed with two options
- destination:- Where the file is gonna store if information technology is not passed so file/image will be stored in systems default folders a callback is passed every bit well to execute.
- filename:- It determines the file name that is almost to be stored in the destination along with the callback which concatenates the name of a file to date at which it is saved.
- The is stored in a variable for the displaying purpose.
var storage = multer.diskStorage({ destination: function (req, file, cb) { cb(goose egg, 'uploads') }, filename: function (req, file, cb) { cb(aught, file.fieldname + '-' + Engagement.now()) } }) var upload = multer({ storage: storage }) Upload form
- In the views, directory create a basic HTML file
- The file consist upload form and button to submit
- The enctype must be multipart/form-data.
- Set the action every bit "/uploadphoto" which volition exist our road and Method to "POST" every bit the user has to upload the information.
Code:-
<!DOCTYPE html> <html lang="en"> <caput> <meta charset="UTF-eight"> <meta name="viewport" content="width=device-width, initial-scale=1.0"> <title>Document</championship> </caput> <body> <h1>Upload Prototype</h1> <course action="/uploadphoto" enctype="multipart/course-data" method="POST"> <input type="file" proper name="myImage" take="image/*"> <input type="submit" value="Upload Photo"> </class> </body> </html>
⇒ enctype='multipart/form–data is an encoding type that allows files to be sent through a POST. Quite simply, without this encoding, the files cannot be sent through POST. If you want to allow a user to upload a file via aclass, you lot must use thisenctype.
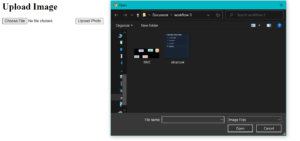
When user will click on select file a window will open which will be defaulted to select images.
Upload Logic and Setting upwardly Routes
- Set a get asking for home page road or index route
- Set a mail service route to "/uploadphoto" use middleware upload.single('myImage')
- Give a callback function and save the epitome in a variable.
- Employ that variable to encode the image to base64 string and pass that to an object of imageschema created before.
- Then use create a role with a callback saving the image to the database as well.
//Routes app.go("/",(req,res)=>{ res.render("index"); }) app.post("/uploadphoto",upload.unmarried('myImage'),(req,res)=>{ var img = fs.readFileSync(req.file.path); var encode_img = img.toString('base64'); var final_img = { contentType:req.file.mimetype, image:new Buffer(encode_img,'base64') }; image.create(final_img,role(err,outcome){ if(err){ console.log(err); }else{ console.log(event.img.Buffer); console.log("Saved To database"); res.contentType(final_img.contentType); res.send(final_img.image); } }) }) Annotation:- Prototype cannot be directly saved in a database they accept to be encoded in equivalent buffer cord and and so can be passed and stored in the database. Hence we utilize function tosring('base64').
⇒When Image is uploaded it saves in the database in the given grade.
Setup App.js
- Require all dependencies in the file
- Set the express server and port.
- Connect to database
- Add all the above files and get-go the server
const limited = require("express"), app = limited(), bodyParser = crave("body-parser"), fs = require("fs"), multer = require("multer"), mongoose = crave("mongoose"); mongoose.connect("mongodb://localhost/Images"); app.utilize(bodyParser.urlencoded( { extended:true } )) app.set("view engine","ejs"); //Schema var imgSchema = mongoose.Schema({ img:{information:Buffer,contentType: Cord} }); var paradigm = mongoose.model("image",imgSchema); // Set STORAGE var storage = multer.diskStorage({ destination: function (req, file, cb) { cb(goose egg, 'uploads') }, filename: part (req, file, cb) { cb(nix, file.fieldname + '-' + Engagement.now()) } }) var upload = multer({ storage: storage }) //Routes app.get("/",(req,res)=>{ res.render("index"); }); app.post("/uploadphoto",upload.single('myImage'),(req,res)=>{ var img = fs.readFileSync(req.file.path); var encode_img = img.toString('base64'); var final_img = { contentType:req.file.mimetype, image:new Buffer(encode_img,'base64') }; image.create(final_img,office(err,upshot){ if(err){ console.log(err); }else{ console.log(effect.img.Buffer); console.log("Saved To database"); res.contentType(final_img.contentType); res.transport(final_img.prototype); } }) }) //Code to get-go server app.listen(2000,role () { panel.log("Server Started at PORT 2000"); })
Source: https://codedec.com/tutorials/image-uploading-to-mongodb-in-nodejs/
0 Response to "How to Upload and Display Image in Html Mongodb"
Post a Comment